Thursday, May 20, 2010

Creating my website photo gallery

In my last post, I explained how I created the Flash design on the homepage of the DSAJ website. In this post, I focus on creating my website gallery which was more challenging and way more time consuming than I initially expected it to be.

My gallery made use of a Jquery lightbox which I obtained from this site. Fortunately, this free lightbox came as a download pack which included all the elements necessary for implementation including sample images, css and html files and of course the jquery scripts.

Preparing images in Photoscape

I started using Photoscape to crop and resize images last summer while I was working for Dominicanewsonline.com. Each image had to be resized twice, and since I was initially dealing with over 50 images this was painstaking, tedious and time-consuming. The thumbnails images were resized to 250x250 px while the larger images were sized down to a width of about 600 pixels.

Implementing the Jquery Gallery

In my website I had two images folders. One folder carried my images such as the banner and GIFs displaying text which I used for image replacements. The other folder I named galleryImages and this folder contained all the thumbnail and larger pictures to be used for my gallery page.

Using dreamweaver, I linked to the jquery scripts and the lightbox CSS in my head of my gallery HTML, as seen in the picture below. Initially there was some conflict, but this was resolved by going into the lightbox.js file and ensuring that it was calling images from the galleryimages folder instead of the images folder which was the original setting.

*linking to the jquery in my gallery html document


I then followed to the letter the installation instructions found on the How to Use section on the web page the lightbox was downloaded from. This resulted in my gallery html source code looking like this:


To get the images to work with the lightbox, the main requirement was to include the code rel=lighbox   in the link to the images.

Image Replacements

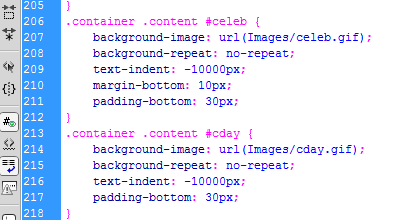
Two instances of image replacement was carried out on my gallery page to name the gallery. I created transparent GIFs in Photoshop and then placed them as background image behind the text they were replacing. I then used CSS to do a text indent and indented the texts to -10000 pixels so that they moved off the screen.

*image replacement in my main.css


*images used for image replacement:


Getting my ish online

The simplest step but also the most time consuming. I used the file manager system on webs.com. Unfortunately because I was using a free account, I had to add each image individually so this took quite a bit of time.

I also had to upload all of the jquery scripts in their js. folder, the lightbox css, my gallery html etc. In the end though, I had this working gallery which I am pretty proud of!

Flash Catalyst CS5

In order to build my website for my final assignment for MC25B I used several of the CS5 applications including Dreamweaver, Photoshop, Illustrator and the spanking new Adobe Flash Catalyst CS5. This application allows you to convert your designs from Photoshop and Illustrator into interactive web content quickly by doing the actionscript for the user behind the scenes. You can find out more about Flash Catalyst CS5 here.

While I'm familiar with Flash Professional, the interface for Catalyst is completely different so I went to the Adobe website and watched a few tutorials on how to use the program. Eventually I came across this straightforward demonstration of use of Catalyst which I used to guide me to create the flash seen on the home page of my DSAJ website.

In this blog post I will recap the steps I took to create my DSAJ website flash.

Starting in Photoshop

I opened a document in Photoshop which was the exact size that I needed the Flash to be to fit into the designated space on my home page.

In order to move elements around in Catalysts from a PSD file, they need to be on their own layer.
Most of my design elements came from my vector library.

Using Bridge to browse for appropriate elements, I then opened the ones I selected in Illustrator, selected them individually and copied and pasted these on separate layers in Photoshop.

I also downloaded the Dominican and Jamaican flags using Google image search. I encountered a problem here because both files were GIFs and I was unable to drag and drop them into my PSD. This problem I solved by selecting them with the rectangular marquee tool, then switching to the move tool in PS and then dragging the selection into my PSD.

Once I had my images I added my text, selecting the Pricedown font becuase I think it best suited the typographic look I was aiming for. I added contrast to my text by giving the word Dominica the green color of the Dominican flag (using the eye-dropper tool), and gave the word Jamaica the yellow color taken from the Jamaican flag. Each word was placed on its own layer to allow me to move them around in Catalyst.

Moving over to Catalyst

Flash Catalyst allows you to add a PSD or AI file to work from, and all the individual layers will be available in the application for manipulation.

I imported my PSD into Catalyst however I quickly noticed that my text came out very jagged. This vexing problem was eventually only resolved by importing my text as non-editable images instead of as editable text which is the default option.

*screenshot from Catalyst with my PSD document opened


In Catalyst, states is the term used to describe the different stages of the Flash that the viewer will eventually see. I named the state with the unadjusted document end.

I then moved the elements on the various layers to different positions on the outside of the document so that they would come in from different directions. This state i named start.

I then used the timeline panel and for synchronized each element to transition from the start state to end state in one second, and for the elements to follow each other in one second intervals instead of all coming in at the same time.

I changed the start state to the default state so that in a browser this would be what the viewer saw first.

The next step was to add the interaction. Using the panel below I selected add Interaction > On application start > Play transition to state > End.

*interaction panel


The final step was to publish my Flash for deployment to my website. I went to File > Publish to SWF/ Air. I then chose the directory I wanted it published to, and keeping the default options I selected Publish.

Moving my flash into Dreamweaver

This was the simplest step. I simply selected my main content div in code view of my website in Dreamweaver where I wanted to place the flash.
Then I copied the code from the html document document which is automatically published together with the SWF, and pasted it into my website html, and voila....'Flash-ism'!!

Conclusion
Flash Catalyst does not eliminate the need for Flash Professional, however many of the things which were unwieldy and time-consuming in Professional is now a breeze in Catalyst. I have obtained a training DVD on Flash Catalyst from Lynda.com which I plan to follow during the summer to learn about the full potential of Catalyst.

Saturday, May 1, 2010

Design Typography


Today I downloaded and read through two very informative e-books; The Non-designers Design Book by Robin Williams, and Art Design in Photoshop by Steve Caplin. I decided to read up on design and specifically typography before I started my design for my DSAJ website, which is the final project for MC25B. Each book contained unique and useful information, and I will just highlight some of this here.

Non-designers Design Book

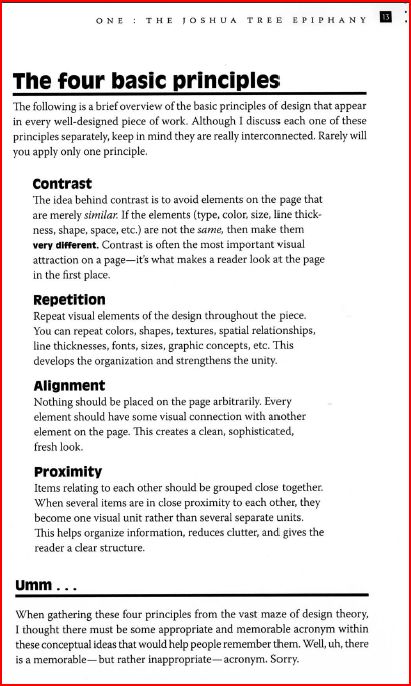
The typography section of this book was very interesting. Some excerpts:


Art design in Photoshop

This book had some good information about what NOT to do in typography. For example:


Both of these books also have tutorials, I plan on trying out one now, and according to how it goes I might blog about it.

Wednesday, April 14, 2010

Customizing a Campaign monitor template

I have just finished customizing a newsletter for JamGrub as part of my Electronic Publishing course.

So this mini-project wasn't for MC25B, but the stuff I was doing definitely required me to call upon my multimedia skills. To customize the template, I was required to make use of Illustrator (replacement vector images), Photoshop (prepare and save these images for the web properly) and Dreamweaver ( to do the image replacement, adjust CSS, add information and links to the HTML)

The template was downloaded from the site http://www.campaignmonitor.com/templates.

I downloaded template 7. It came as a zip file which I unzipped, and found that the folder contained an HTML file with the CSS contained in the head, stock images, and the PSD file which was used to design the template.

I replaced the stock images with images of my own. These replacement images were taken from the blog posts, and resized using Photoscape.

I then deleted the stock images which came with the templates and made the changes to the html file so that the newsletter would call my new images instead.

A bit more complicated was replacing some of the design elements of the newsletter such as separators. I used Photoshop to open documents the same size as the already existing ones, copied and pasted vector images from Illstrator to Photoshop, and then using the save for web dialogue in PS, I saved these as PNGs with transparency. I then changed the HTML to call the new images.

Once I had the design and images customized, I had to input text which I simply copied and pasted from the blog posts. I also inserted the URLs to the individual pages of the site which could be accessed by clicking 'Read more' after the introductory passage of each story in the newsletter.

Here is a before and after of the template

BEFORE:


After:

Monday, April 5, 2010

More Photoshop shortcuts etc


Easter weekend, nothing else to do than watch Lynda.com training videos. What a life.

Been jumping from one to the other, started two Joomla dvds and never finished, browsed through a wordpress dvd, and now i've decided to go through this Photoshop CS4 Essential training dvd. I know most of this stuff but what I'm learning is some real cool keyboard shortcuts I had no idea existed. So I'm going to record them here otherwise I'll forget them in a day or two.


Scrolling through blend modes:
Select the layer you want to blend.
Select the move tool.
Hold down shift and then use the + and - to toggle the blend modes.


Adjusting opacity
Select the layer
Choose move tool
Use numbers on keyboard 1-9 to adjust opacity.

Working with masks
Make a selection on the image to be masked at edge
Go to the masks tab above layers panel to adjust the density etc of the masks.

Cropping
Possible to hide the cropped out part of image rather than delete by selecting delete in crop options.
Going to Image>reveal all, will show content that was hidden if cropped this way.
Selection tools can be used to select a part of an image to be cropped as well.

Straighten an image by cropping
Choose the ruler tool which is behind eye dropper tool.
Click on horizon, and drag to select it.
Go to image>image rotation>arbitrary.
Click OK to rotate image.
Use crop tool to select portion that is straight.
*Photoshop can do this automatically for several images on one layer. Go to File>Automate>Crop and straighten photos.

Transforming images
Control + t on image allows it to be transformed.
Hold down control to distort image.
Hold down ctrl+alt to skewer image
Hold down ctrl+alt+shift to change perspective.
Warp image by choosing warp option (top right of screen).

Smart objects
Convert image by right clicking on name of the layer in the layers panel and selectiong convert to Smart Object.

Content aware scaling
Select this feature by going to Edit>content aware scaling.
Choose 'protect skin tones' icon to protect someone's face while scaling.
To protect complete subject, select the person using selection tool eg magic wand > go to select menu and save the selection> Deselect the selection(ctrl+d) > go to channels panel to view the alpha mask which was created> before scaling, uncheck protect skin tone> go to protect and choose the alpha which was created> click the check mark to commit to the scale> remove extra area of canvas by going to image menu and choosing trim the transparent pixels.

Adjusting type
To select text and hide highlight over selected area: ctrl+h.
To align text on separate layers: use ctrl to select both layers> select the move tool> choose appropriate align eg align left edges.
To alter size of text from the center while constraining the proportions: holt alt+shift while dragging from a corner point.

Layer styles
While in drop shadow dialogue, click on the image and drag to adjust the shadow.
Hold down alt and drag to copy style from one layer to the other.
Save a style by selecting styled layer, and go to styles panel and select new style.

***Adjust hardness or softness of brush by holding shift and hitting left bracket.

Combining similar images with change in subject.

Open the images in bridge and select both by ctrl-clicking.
In PS, go to tools>PS>Load files into PS layers
Align images in PS by going to edit>auto align layers and then choose auto.
Create layer mask on top layer.
Use brush to remove subject on top layer and reveal same subject below.

**Pressing alt+0169 gives copywright sign in bridge

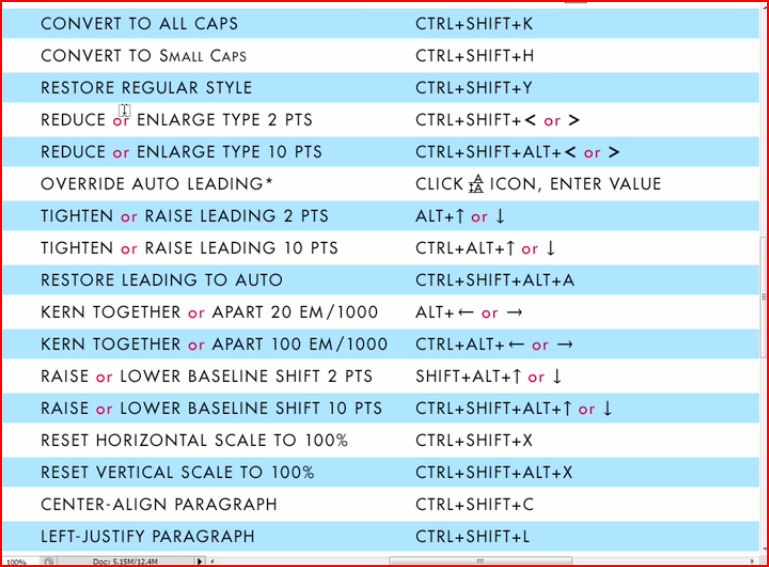
Some typography shortcuts in PS


Monday, March 15, 2010