Easter weekend, nothing else to do than watch Lynda.com training videos. What a life.
Been jumping from one to the other, started two
Joomla dvds and never finished, browsed through a wordpress dvd, and now i've decided to go through this Photoshop CS4 Essential training dvd. I know most of this stuff but what I'm learning is some real cool keyboard shortcuts I had no idea existed. So I'm going to record them here otherwise I'll forget them in a day or two.
Scrolling through blend modes:Select the layer you want to blend.
Select the move tool.
Hold down shift and then use the + and - to toggle the blend modes.
Adjusting opacity
Select the layer
Choose move tool
Use numbers on keyboard 1-9 to adjust opacity.
Working with masksMake a selection on the image to be masked at edge
Go to the masks tab above layers panel to adjust the density etc of the masks.
CroppingPossible to hide the cropped out part of image rather than delete by selecting delete in crop options.
Going to Image>reveal all, will show content that was hidden if cropped this way.
Selection tools can be used to select a part of an image to be cropped as well.
Straighten an image by croppingChoose the ruler tool which is behind eye dropper tool.
Click on horizon, and drag to select it.
Go to image>image rotation>arbitrary.
Click OK to rotate image.
Use crop tool to select portion that is straight.
*Photoshop can do this automatically for several images on one layer. Go to File>Automate>Crop and straighten photos.
Transforming imagesControl + t on image allows it to be transformed.
Hold down control to distort image.
Hold down ctrl+alt to skewer image
Hold down ctrl+alt+shift to change perspective.
Warp image by choosing warp option (top right of screen).
Smart objectsConvert image by right clicking on name of the layer in the layers panel and selectiong convert to Smart Object.
Content aware scalingSelect this feature by going to Edit>content aware scaling.
Choose 'protect skin tones' icon to protect someone's face while scaling.
To protect complete subject, select the person using selection tool eg magic wand > go to select menu and save the selection> Deselect the selection(ctrl+d) > go to channels panel to view the alpha mask which was created> before scaling, uncheck protect skin tone> go to protect and choose the alpha which was created> click the check mark to commit to the scale> remove extra area of canvas by going to image menu and choosing trim the transparent pixels.
Adjusting typeTo select text and hide highlight over selected area: ctrl+h.
To align text on separate layers: use ctrl to select both layers> select the move tool> choose appropriate align eg align left edges.
To alter size of text from the center while constraining the proportions: holt alt+shift while dragging from a corner point.
Layer stylesWhile in drop shadow dialogue, click on the image and drag to adjust the shadow.
Hold down alt and drag to copy style from one layer to the other.
Save a style by selecting styled layer, and go to styles panel and select new style.
***Adjust hardness or softness of brush by holding shift and hitting left bracket.
Combining similar images with change in subject.
Open the images in bridge and select both by ctrl-clicking.
In PS, go to tools>PS>Load files into PS layers
Align images in PS by going to edit>auto align layers and then choose auto.
Create layer mask on top layer.
Use brush to remove subject on top layer and reveal same subject below.
**Pressing alt+0169 gives copywright sign in bridge
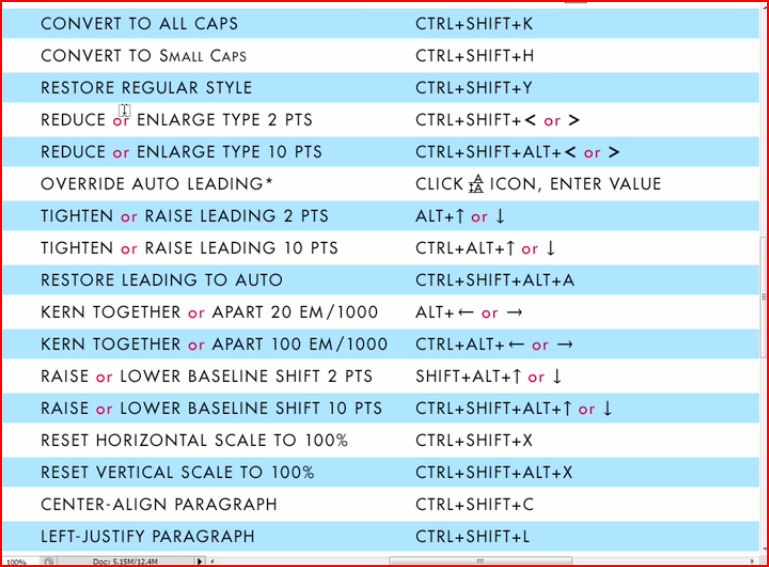
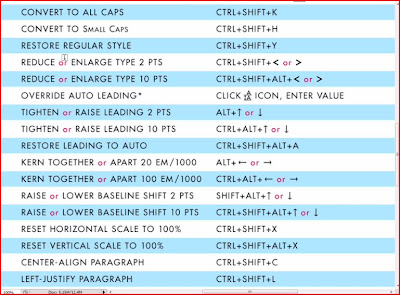
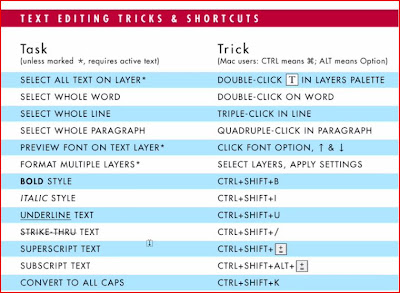
Some typography shortcuts in PS